扩展Redux
Redux本身提供了强大的数据流管理功能, 而其更强大之处在于它提供了扩展能力
中间件
中间件是一些函数, 相互之间是独立的, 用于定制对特定action的处理过程

- 中间件是独立的函数
- 中间件是可以组合使用的
- 中间件有一个统一的接口
中间件接口
Redux框架中, 中间件处理的是action对象, action在进入到reducer通过dispatch派发之前, 会先经过中间件
中间件会接收到action对象, 经过处理后交给下一个中间件, 或者中断这个action的处理
function doNothingMiddleware({ dispatch, getState }) {
    return function(next) {
        return function(action) {
            return next(action)
        }
    }
}
- 每个中间件都是一个函数
- 返回一个接受next参数的函数
- 接受next参数的函数, 又返回一个接受action参数的函数
- next本身也是一个函数, 中间件调用next函数通知redux自己的工作已经结束
- dispatch和getState是Redux上的两个函数, 不过并不是所有中间件都能用到
借助上述这些函数, 中间件可以完成很多工作:
- 调用dispatch派发一个新的action对象
- 调用getState获得当前状态
- 调用next告诉Redux当前中间件工作完毕, 让下一个中间件处理
- 访问action对象上的数据
Redux中间件借助函数式的思想, 让每个函数功能尽可能的小, 通过函数的嵌套组合来实现复杂功能
redux-thunk的实现如下:
function createThunkMiddleware(extraArgument) {
    return ({ dispatch, getState }) => next => action => {
        if (typeof action === 'function') {
            return action(dispatch, getState, extraArgument)
        }
        return next(action)
    }
}

const trunk = createThunkMiddleware()
export default thunk
- ({ dispatch, getState }) => next => action => 是ES6提供的箭头语法, 用来表示嵌套函数
- dispatch函数的返回结果是不可预测的, 中间件不能依赖dispatch的返回值
使用中间件
中间件有两种使用方法:
- 使用applyMiddleware来包装, 通过createStore产生一个新撞见的Store
import { createStore, applyMiddleware } from 'redux'
import thunkMiddleware from 'redux-thunk'

const configureStore = applyMiddleware(thunkMiddleware)(createStore)
const store = configureStore(reducer, initialState)
这种方法如果需要增加其他中间件, 使用起来会很不方便, 这种方法已经很少使用
- 把applyMiddleware的结果当做Store Enhancer
import { createStore, applyMiddleware, compose } from 'redux'
import thunkMiddleware from 'redux-thunk'

const middlewires = [thunkMiddleware]
if (process.env.NODE_ENV !== 'production') {
  middlewires.push(require('redux-immutable-state-invariant').default())
}

const win = window
const storeEnhancers = compose(
  applyMiddleware(...middlewires),
  (win && win.devToolsExtension) ? win.devToolsExtension() : (f) => f,
)

export default createStore(reducer, {}, storeEnhancers)
通过compose连接多个中间件, 第一个参数是已有的中间件, 中间件会被顺序执行; 将storeEnhancers作为参数传递给createStore
Promise中间件
实现一个处理Promise的中间件, 以便于更好的理解中间件的工作方式
function isPromise(obj) {
  return obj && typeof obj.then === 'function'
}

export default ({dispatch}) => next => action => {
  return isPromise(action) ? action.then(dispatch) : next(action)
}
进一步完善功能:
function isPromise(obj) {
  return obj && typeof obj.then === 'function'
}

export default ({dispatch}) => next => action => {

  const {types, promise, ...rest} = action

  if (!isPromise(promise) || !(types && types.length === 3)) {
    return next(action)
  }

  const [PENDING, DONE, FAIL] = types
  dispatch({...rest, type: PENDING})

  return promise.then(
    (result) => dispatch({...rest, result, type: DONE}),
    (error) => dispatch({...rest, error, type: FAIL})
  )
}
- 处理异步请求的进行中, 成功和失败三种状态
- 首先派发PENDING状态, 当任务完成或失败的时候, 再派发DONE或FAIL
- 上述promise中间件处理的action格式为
{
    promise: fetch(apiUrl),
    types: ['pending', 'success', 'failure']
}
相应的, weather中的代码可以修改为:
export const fetchWeather = (cityCode) => {
  const apiUrl = `/data/cityinfo/${cityCode}.html`

  return {
    promise: fetch(apiUrl).then(response => {
      if (response.status !== 200) {
        throw new Error(`Fail to get response with status ${response.status}`)
      }

      response.json().then(responseJson => responseJson.weatherinfo)
    }),
    types: [FETCH_STARTED, FETCH_SUCCESS, FETCH_FAILURE]
  }
}
中间件开发原则
- 首先, 要明确中间件的目的, 保证中间件简洁和独立, 通过组合来完成更复杂的功能
- 每个中间件要独立存在, 但是要考虑到其他中间件的存在
- 一个中间件如果产生了新的action对象, 应该使用dispatch派发, 而不是使用next函数, 因为next函数不会让action经历所有中间件
Store Enhancer
中间件可以用来增强dispatch方法, 但也仅限于此, 如果想要对Redux Store进行更深层次的定制, 就需要使用Store Enhancer
增强器接口
Store Enhancer是一个函数, 接受一个createStore模样的函数作为参数, 并返回一个新的createStore
const doNothingEnhancer = (createStore) => (reducer, preloadedState, enhancer) => {
    return createStore(reducer, preloadedState, enhancer)
}
创建store, 定制store并将store返回
const logEnhancer = (createStore) => (reducer, preloadedState, enhancer) => {
  const store = createStore(reducer, preloadedState, enhancer)

  const originalDispatch = store.dispatch
  store.dispatch = (action) => {
    console.log(`dispatch action:`, action)
    originalDispatch(action)
  }

  return store
}
可以定制的接口包括:
- dispatch
- getState
- subscribe
- replaceReducer
多页面应用
在一个复杂的应用中, 用户会在多个页面之间来回切换, 开发者要保证切换过程足够流畅, 解决方法是逻辑上的多页面应用, 本质上还是单页的
单页应用
在传统多页面应用中, 每次切换都是一次网页的刷新
- 浏览器地址栏的URL发生变化, 获取完整的页面HTML
- 解析HTML内容
- 浏览器根据HTML内容来加载其他资源
- 根据HTML以及其他资源渲染页面, 并等待用户操作
这种方式进行的切换, 首先在切换的时候会存在比较明显的延迟, 同时, 很多情况下切换的时候只是局部发生变化, 却要刷新整个页面, 这会带来极大的浪费
业界有很多方案进行局部刷新的切换, 只是造成视觉上的多页切换, 目标是:
- 不同页面之间切换不会造成网页的刷新
- 页面内容和URL保持一致
对于内容和URL保持一致, 当页面发生切换的时候URL也会发生变化, 通过浏览器的History API可以实现在不刷新网页的情况下修改URL; 另外一个方面, 当用户在地址栏直接输入某个URL的时候, 也会在网页上显示正确的内容, 这也是所谓可收藏的意义
使用create-react-app创建的React应用本身就具有服务器功能, 访问public目录下存在的资源时, 就会返回该资源, 否则就返回默认的index.html
React-Router
创建React多页面应用需要利用React-Router库
路由
React-Router提供了两个组件来完成路由功能:
- Router - 整个应用只包含一个实例, 代表整个路由器
- Route - 代表一个路径对应页面的规则, 应该会存在多个实例
$ yarn add react-router react-router-dom
首先创建三个简单的无状态页面: Home, About, NotFound
// pages/Home.js
import React from 'react';

const Home = () => (
  <div>Home</div>
);

export default Home;

// pages/About.js
import React from 'react';

const About = () => (
  <div>About</div>
);

export default About;

// pages/NotFound.js
import React from 'react';

const NotFound = () => (
  <div>NotFound</div>
);

export default NotFound;
接着创建一个路由组件来定义路由规则:
import React from 'react';
import { BrowserRouter as Router, Route, Link, Switch } from 'react-router-dom'

import Home from './pages/Home'
import About from './pages/About'
import NotFound from './pages/NotFound'

const Routes = () => (
  <Router>
    <div>
      <Switch>
        <Route path="/home" component={Home} />
        <Route path="/about" component={About} />
        <Route component={NotFound} />
      </Switch>
    </div>
  </Router>
);

export default Routes;
将路由组件装载到App.js中:
import React, { Component } from 'react';
import Routes from './Routes';

class App extends Component {
  render() {
    return (
      <div className="container">
        <Routes />
      </div>
    );
  }
}

export default App;
页面访问http://localhost:3000/home可以加载对应的组件:

在最顶层通过Router包装后, 所有的组件都在Router的控制之下
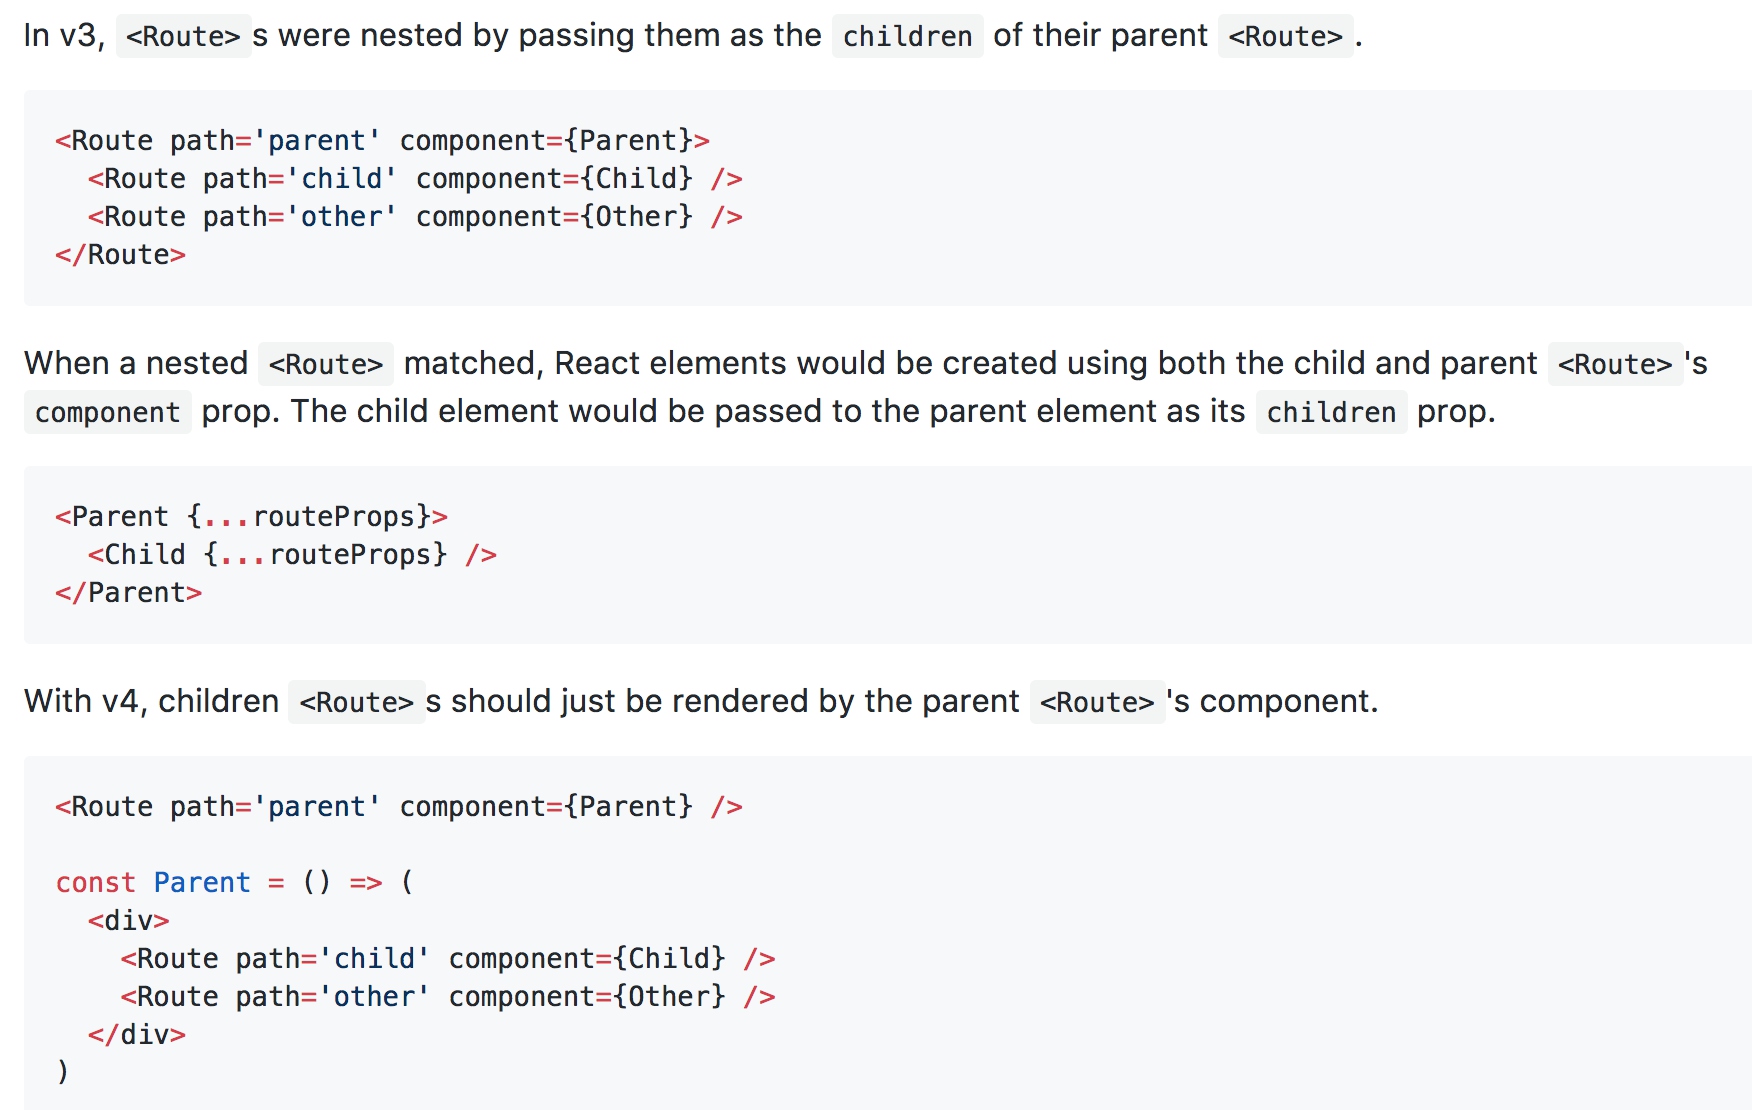
路由链接和嵌套
在React-Router的v4版本中, 嵌套路由是通过组件的方式表达的
const App = () => (
  <BrowserRouter>
    {/* here's a div */}
    <div>
      {/* here's a Route */}
      <Route path="/tacos" component={Tacos}/>
    </div>
  </BrowserRouter>
)

// when the url matches `/tacos` this component renders
const Tacos  = ({ match }) => (
  // here's a nested div
  <div>
    {/* here's a nested Route,
        match.url helps us make a relative path */}
    <Route
      path={match.url + '/carnitas'}
      component={Carnitas}
    />
  </div>
)
子路由直接在子组件中表达
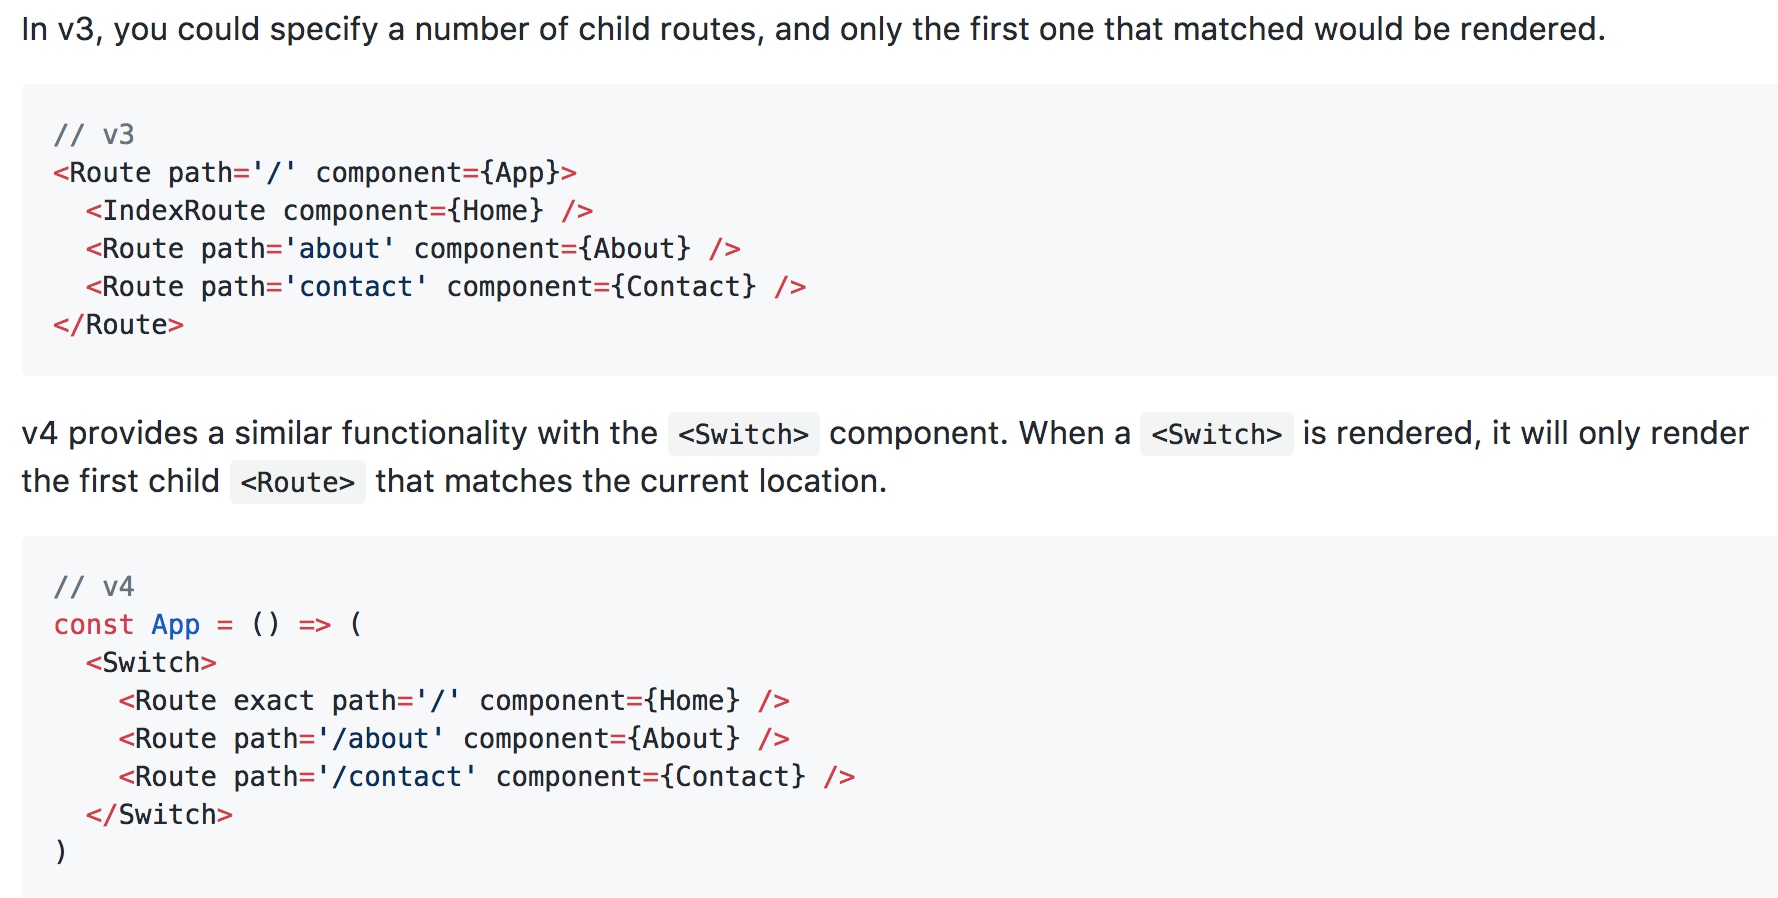
默认链接
  <Switch>
    <Route path="/" exact component={Home}/>
    <Route path="/about" component={About}/>
    <Route component={NotFound}/>
  </Switch>
- path=”/” 指定了默认链接, exact保证他不会被其他路由匹配到
集成Redux
正常情况下react-router和Redux没有什么关系, 但是我们希望Redux来管理应用的状态, 为了达到这样的目的, 需要将Router包裹在Provider之内
  <Provider store={store}>
    <Routes />
  </Provider>
注意, Redux的一个重要原则就是唯一数据源, 唯一数据源说的不是所有数据保存在同一个地方, 而是说一个特定的数据只保存在一个地方, 即使将redux和router结合, 也不是将所有信息都保存在store中, 路由相关的数据依然只保存在浏览器的URL上
这样做有一个缺陷, 如果路由数据没有保存在store中, 使用Redux Devtools就无法跟踪路由变化, 解决方案是通过react-router-redux库, 其工作原理是在store的routing字段上保存当前路由信息, 由库来保证绝对一致性
This repo is for react-router-redux 4.x, which is only compatible with react-router 2.x and 3.x The next version of react-router-redux will be 5.0.0 and will be compatible with react-router 4.x.
但是当前版本下, react-router-redux只兼容react-router 3.x, 并不兼容4.x
代码分片
在create-react-app创造的应用中, 由webpack产生的唯一打包文件被命名为bundle.js
这样的做法在小型应用中自然没有问题, 但是在大型应用中, 这样会严重影响首页的加载性能
另外, 由于网站会随时进行更新, 每次更新并不希望刷新整个bundle
解决方案是将整个应用分片打包, 然后按需加载
理想情况下, 页面被加载的时候, 会分为几个部分:
- 应用自身的bundle.js
- 页面之间共同部分common.js
- 页面特有的打包文件
通过webpack, 可以很容易的完成上述分包工作
https://github.com/facebookincubator/create-react-app/blob/master/packages/react-scripts/template/README.md#code-splitting https://serverless-stack.com/chapters/code-splitting-in-create-react-app.html
当前的组件加载是通过路由直接加载组件:
  <Switch>
    <Route path="/" exact component={Home}/>
    <Route path="/about" component={About}/>
    <Route component={NotFound}/>
  </Switch>
首先定义一个异步组件来动态加载组件:
import React, { Component } from 'react';

export default function asyncComponent(importComponent) {
  class AsyncComponent extends Component {
    constructor(props) {
      super(props)

      this.state = {
        component: null
      }
    }

    async componentDidMount() {
      const {default: component} = await importComponent()
      this.setState({
        component: component
      })
    }

    render() {
      const C = this.state.component
      return C ? <C {...this.props} /> : null
    }
  }

  return AsyncComponent
}
- asyncComponent接受参数importComponent, importComponent就是要动态加载的组件
- componentDidMount中调用需要加载的组件并保存在state中
- render会判断组件是否加载完成, 如果是则渲染
接着, 去掉组件的直接引用:
// import Home from './pages/Home'
// import About from './pages/About'
// import NotFound from './pages/NotFound'
并使用动态组件来加载, webpack能够解析import并将其打包为独立的chunk:
const asyncHome = asyncComponent(() => import('./pages/Home'))
const asyncAbout = asyncComponent(() => import('./pages/About'))
const asyncNotFound = asyncComponent(() => import('./pages/NotFound'))
将Route中的组件切换到异步组件:
  <Switch>
    <Route path="/" exact component={asyncHome}/>
    <Route path="/about" component={asyncAbout}/>
    <Route component={asyncNotFound}/>
  </Switch>
在页面上, 当我们点击连接的时候, chunk才会被动态加载:
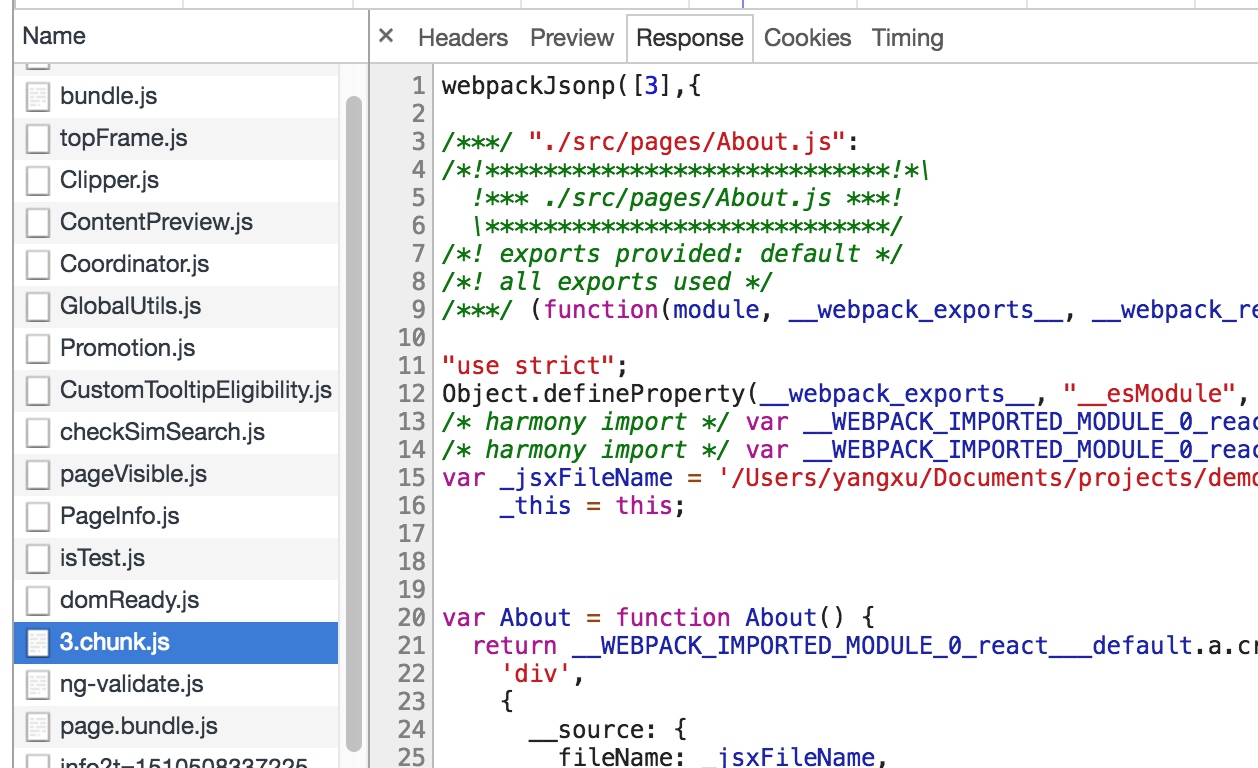
使用yarn build打包的时候, 可以看到整个应用被分片:
  61.57 KB  build/static/js/main.db48d80f.js
  19.21 KB  build/static/css/main.4bab10bc.css
  221 B     build/static/js/0.03f5a6ac.chunk.js
  220 B     build/static/js/2.6af50ec6.chunk.js
  218 B     build/static/js/1.f6dcd0da.chunk.js